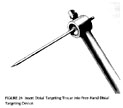
The distal locking screws are inserted with a free-hand technique usingthe Free-Hand Distal Targeting Device*. Insert an appropriate size DistalTargeting Trocar (3.5 mm Trocar for 4.5 mm screws, 5.0 mm Trocar for 6.5mm screws) into the Targeting Device (click image to enlarge).Tighten the Targeting Device Set Screw with the Pin Wrench.
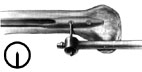
It is very important to properly position the C-arm. Position the C-armso the hole of the nail appears perfectly round on the monitor (clickimage to enlarge). Technical Tip: Move the large receiving end of theC-arm as far away from the leg as possible. This will magnify the holesat the distal targeting site.
 Use the tip of theTrocar to identify the incision site on the lateral aspect of the thighover the proximal hole. Make a I cm incision and use a straight hemostatto spread the tissue down to the bone surface. Insert the Trocar until itcontacts the femur. Use the C-arm view to center the tip of the Trocar overthe proximal hole (click image to enlarge).

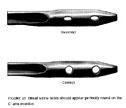
Then use the C-arm to align the Trocar in the proper plane. Use a malletto drive the Trocar into the femur and through the hole in the nail butnot through the opposite cortex. (click image to enlarge).
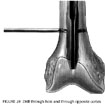
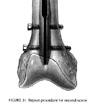
Remove the trocar from the most proximal distal hole. Insert the appropriatesize drill bit by hand. Check the AP and lateral C-arm views to ensure thatthe drill bit is properly placed in the proximal hole. Attach power anddrill through the far cortex (click image to enlarge).
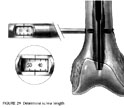
Use the Screw Depth Gauge to select the proper length screw. 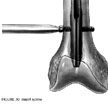 Read the length directlyoff the Gauge
(click images to enlarge).
Use the T-Handle Screwdriver to insert the screw through the proximalhole .
 Insert the distallocking screw in the same manner. Check the position of both screws withthe C-arm in the AP and lateral planes.
![]()
![]()
![]()