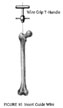
Bend the Bulb-tipped Guide Wire to create a 15- to 20 degree curve approximately2 cm from the bulb tip. Attach the Guide Wire to the Wire Grip T-Handleand tighten. Insert the Guide Wire through the hole and reduce the fracture(click image to enlarge). Pass the wire across the fracture siteunder C-arm control and into the distal fragment.
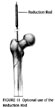
If reduction of the abducted and flexed hip is difficult, place pressureon the anterior aspect of the proximal fragment either with the hand ordirectly with an instrument. If necessary, ream the proximal fragment to12 mm and use the optional Reduction Rod to manipulate the proximal fragmentinto alignment with the shaft fragment. Pass the Guide Wire through theRod and into the distal femur (click image to enlarge ) . Thenremove the Rod.
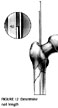
Determine the proper nail length by placing a second guide wire of equallength on the greater trochanter. The length of the wire that is not overlappingis the correct nail length required (click image to enlarge).
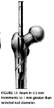
Place the Skin Protector in the wound, and ream the femoral canal inI mm increments until contact is made with the cortical wall. Then continueto ream in 0.5 mm increments (click image to enlarge). Overreamthe femoral canal by I mm greater than the selected nail size.
NOTE: The proximal diameter of the 10, 11 and 12 mm ZMS Recon Nails is13 mm. Therefore, overream the proximal fragment to just below the levelof the lesser trochanter to 14 mm for these nail diameters (Table 111).This is necessary to allow for rotational control of the nail.
NAIL DIA. (mm) | REAM SHAFT (mm) | REAM PROXIMAL (mm) |
10 | 11 | 14 |
11 | 12 | 14 |
12 | 13 | 14 |
13 | 14 | 14 |
14 | 15 | 15 |
15 | 16 | 16 |
Table 111. ZMS Recon Nail Proximal Reaming Chart
![]()
![]()
![]()